ANBERNIC RG351P

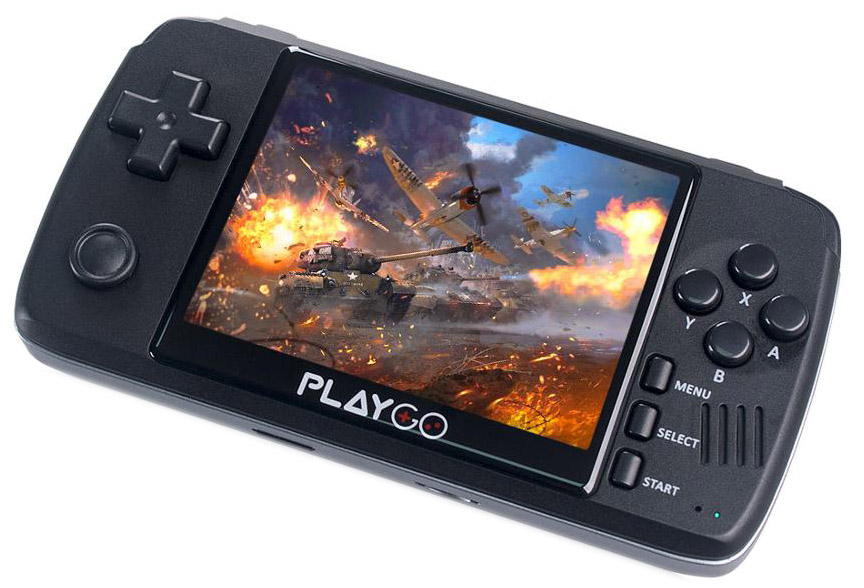
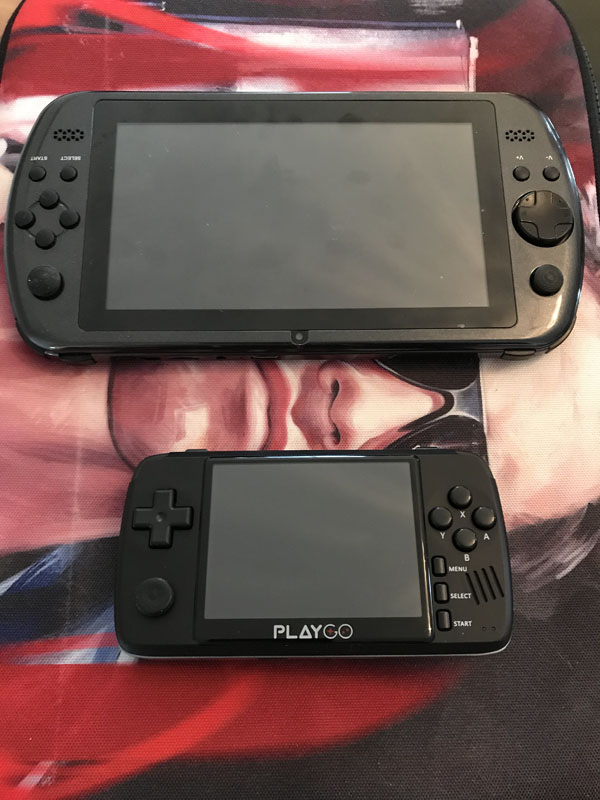
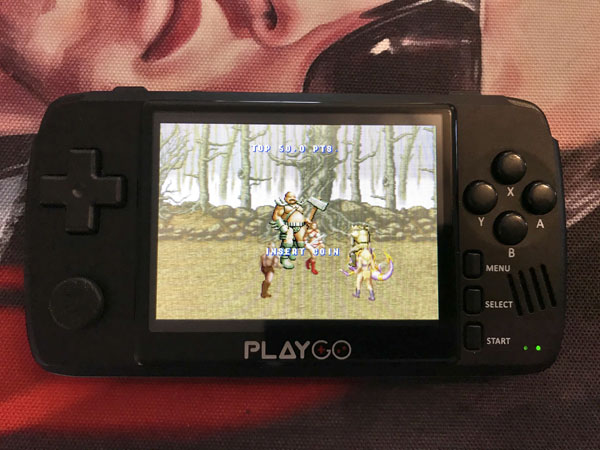
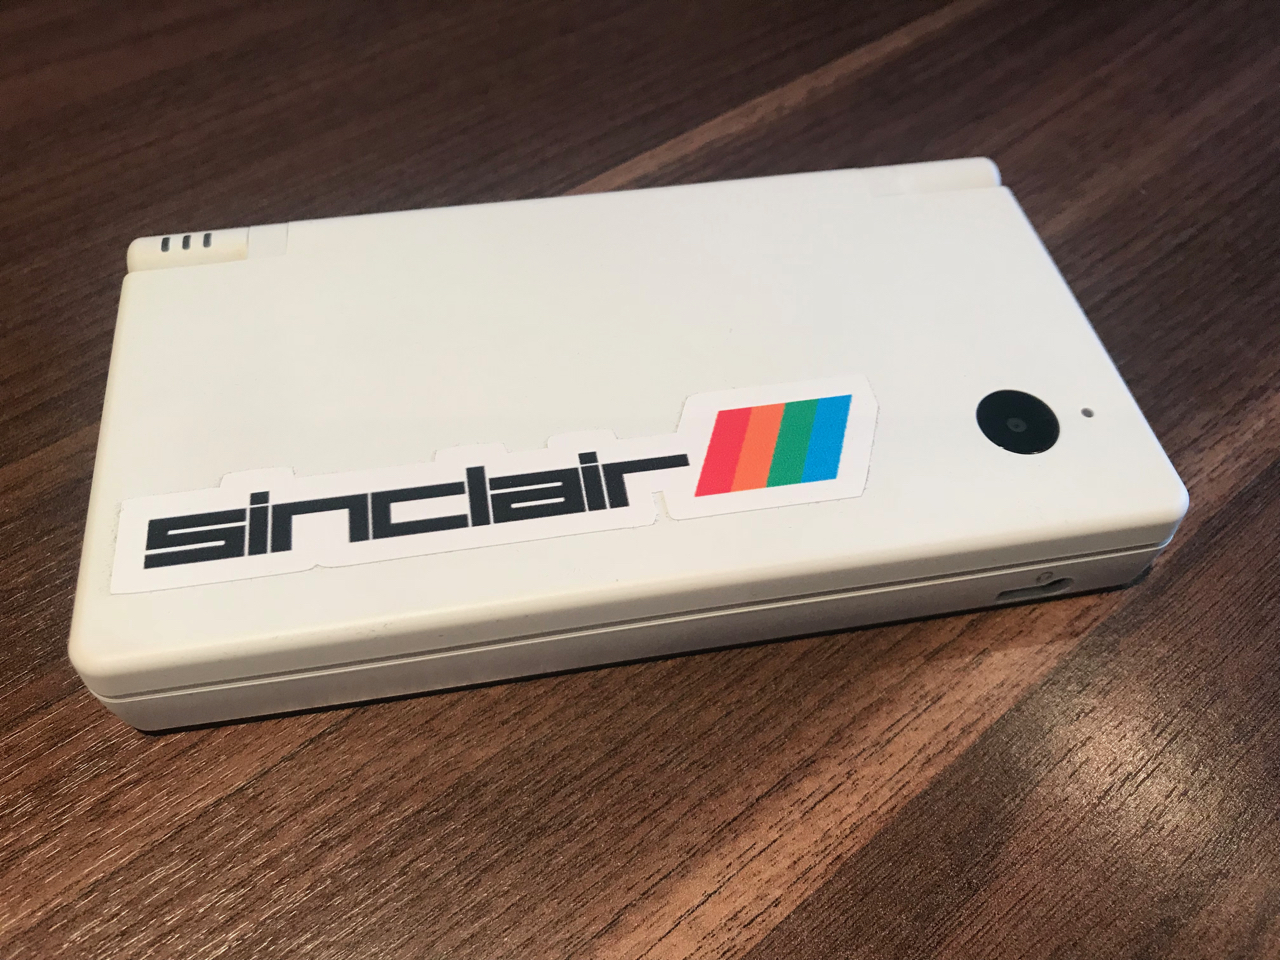
Another year goes by and I find myself upgrading my current hand-held retro gaming system for another, partly for slight improvements but also because the new devices are so cheap and cool looking that I have to buy them. I was getting on really well with the PocketGo 2 (aka the PlayGo), but the RG351p was getting good reviews so I decided that for under £70 it was worth trying out.

TECH SPECS

Not that it makes a huge amount of difference when emulating most of these older systems, but the RG351p is more powerful than the PocketGo 2…

  • Processor: 1.5Ghz quad core (vs PocketGo 2’s 1Ghz dual core)
  • Display: 3.5″ 480×320 (vs PocketGo 2’s 3.5″ 320×240)
  • RAM: 1GB (vs PocketGo 2’s 512MB)
  • Storage: No internal storage for games, all games are stored on the micro sd card
  • Speakers: Stereo (vs PocketGo 2’s mono speaker)
  • I/O: x2 USB-C, micro sd, 3.5mm headphone jack
  • Battery: 5-7 hours (approx. the same as the PocketGo 2)
  • Dimensions: 15.6cm width x 7.1cm height x 1.8cm depth (approx. the same as the PocketGo 2)
  • Product Weight: 160 grams (approx. the same as the PocketGo 2)

Despite being an improved processor, I had exactly the same issues with Grand Theft Auto: Liberty City Stories on the PSP with stuttering graphics and audio, so the limit of this device is really still the PS1.

(The answer to emulating PSP games would probably be to just buy a PSP and use it as a retro gaming device. I’m not really sure why I don’t do that now I’ve asked myself the question, but anyway…)

Even the Gameboy Advance struggles slightly in Final Fantasy I & II when I fly over the map in the airship with the audio stuttering. Probably there are some GBA emulator settings I could tinker with, but until it actually becomes a problem in a particular game the performance is generally great.

CONTROLS & AUDIO

The buttons on the RG351p feel really good to the touch. One of my issues with the PocketGo 2 was the single joystick that was a pointless addition as it was too rigid to function as a controller, not that I really use the joystick for many retro games but the option would be nice. The RG351p however has twin joysticks – much like using a modern Playstation controller.

Audio is also improved with stereo speakers and the very nice addition of a volume dial to better control levels.

BATTERY

Battery life is comparable to the PocketGo 2. I recently played the GBA version of Final Fantasy II on a four hour plane journey and happily got to my destination with some battery life remaining.

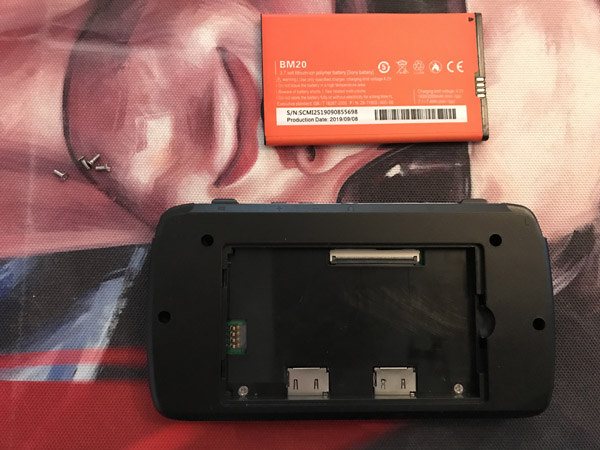
The PocketGo 2 had a removable battery which was a good option for a quick battery swap to keep playing if you were on the move. The RG351p is a sealed unit so you’ll need a power source or a power bank.

The unit can be unscrewed however and the battery is easy accessible should you need to replace it one day if it begins to suffer batter drain, but I do ask myself – will I own this unit long enough to ever notice battery drain? Probably not.

TURNING IT ON

My main reason for upgrading from both the Blaze Tab Plus and PlayGo was the GUI. The RG351p comes with EmuElec which was immediately a more friendly interface to navigate and I was happy with it until disaster struck during a play through of Final Fantasy when the sd card became corrupted (due to me switching off via the on/off switch rather than actually shutting down the device!) This didn’t seem like a problem at first as I copied off all my game data expecting to flash a new sd card with the firmware and pick up where I left off, but I’d stupidly not made a copy of the supplied sd card and now looking online for the firmware drew a blank – something to do with a copyright issue. But my search did come up with ArkOS as a replacement.

You can happily stay with EmuElec, but ArkOS does feel like a further improvement. A guide to installing it, should you want to, can be found here.

The lesson I learned here is to make a copy of the supplied sd card and store the cheap supplied card away somewhere safe, and use a new branded sd card for the device.

My one criticism about the device, which is really less about the unit than the front-end, is that it’s not always immediately obvious what the control configuration is under each emulator – I tend to spend the first five minutes with each system figuring out what button gets me back to the emulator menu and working out how to use save states. For example, using the GBA emulator, the select button + B brings up the map in Final Fantasy but the GBA emulator seemed to be controls seemed to be configured not to include the select button, so you have to go in to the emulator settings in FF, go to the controls sub menu and allocate the select button to a button on the device.

ADDING EMULATORS & ROMS

I bought my device from Ali Express and it came pre-installed with a raft of systems and roms, more than I’ll ever play. Depending on where you buy it from it’ll probably come with a different pre-installed set of roms and games, and because of copyright no-one will likely list exactly what it comes with, but whatever you get it’s going to come out-of-the-box ready and it’s easy to add to the system should you want to.

After reinstalling ArkOS I decided to curate my list of systems and games to a more manageable selection rather than having too much to choose from; mostly I’m using Mame, SNES and Gameboy Advance emulators. Emulators with no game roms won’t show up on the menu screen which works well, and additionally using the sub-menus you can hide systems if you want to.

The system comes with a wi-fi dongle which I set up fairly easily for adding roms across wi-fi, but it lost its connection one day and realised that I just found it quicker to pop out the micro sd and copy the roms directly on to it on my laptop.

OVER-ALL

The RG351p is a really nicely built unit with a great screen, great controls and good audio. There is nothing not to like about it.

The only thing that’s really going to make me upgrade one day is if a system comes out with a larger screen. The 3.5″ screens of these handhelds works well for most games, but I find some wanting a bit more real estate to see tiny graphical details…or perhaps it’s just my eyes.

See the below mock-up showing Black Tiger in original 4:3 aspect ratio (so not stretched in X to fill the full screen area). There’s still probably 1/2cm between the edges of the screen and the glass, so it’d be great off one of these units used the full real estate of the screen area – you can see from the mock-up how much additional image you’d get in the screen space available.

Actual screen size
Expanded screen size

PLAYGO (AKA POCKETGO V2)

PlayGo HandheldIt’s been an AGE since I last posted anything to this blog as I’ve been busy with work, but now being at home in isolation I have no excuse! I’ve played quite a few retro games this past year, but the thing I want to post about is my new handheld to replace my Blaze Tab Plus.

There have been a number of handhelds that I’ve read about over the past few years, but as I’ve not had any complaints with the Blaze Tab none have really seemed a necessary purchase. But recently I spotted something that caught my attention.

I’m not sure now exactly what caught my eye about PocketGo v2 handheld, but probably the one thing counting against the Blaze Tab is that it’s big (probably because it’s essentially a tablet in a gaming case). This has never been much of a practical issue as it’s always been in a bag when I’m travelling, and actually the large screen size of several inches is a great feature, but because I’ve been carrying it in a bag the plastic screen has gotten more and more scratched over the years. So when I saw a much more compact handheld with better specs than the Blaze Tab and a scratch-resistant glass screen, it got my interest.

PLAYGO OR POCKETGO V2?

So which is it? It was the PocketGo v2 that I first saw, but while Googling for some info on the device I came across the PlayGo which is the same device in black under a different brand name from AliExpress. Ultimately I opted for the PlayGo just because I liked the look of the black unit over the grey of the PocketGo v2.

TECH SPECS

For retro gaming, the tech specs of many new handhelds almost seem irrelevant as they’ll comfortably run anything up to and including a PS1 with only the most graphically intensive PS1 games causing an issue. I recently installed Driver on my Blaze Tab for example and it ran great, and I have only just found the limits of the device when trying to run Grand Theft Auto Vice City Stories on an emulated PSP and found the emulation would stutter (when is this game coming to the iPhone like all the other GTAs before?).

  • Processor: JZ4770 dual-core 64Bit running at 1.00Ghz
  • Display: 3.5″ 320 x 240 pixel tempered glass
  • RAM: 512MB DDR2
  • Storage: 32GB with second micro SD expansion slot (up to 128GB)
  • Speakers: Built-in mono speaker
  • I/O: 3.5mm headphone jack, USB type-C port (cable included), 2x micro SD card/TF card slot
  • Battery: Li-Ion BL-5B 2000mAh Built-in (around 5 hours battery life)
  • Dimensions: (L x W x H): 13.8cm x 7.5cm x 1.5cm / 5.43″ x 2.95″ x 0.59″
  • Product Weight: 160g

For comparison, the Blaze Tab featured a RK-3188processor(ARM Cortex A9 1.8GHz Quad Core CPU, ARM Mali400 3D graphics acceleration hardware GPU) and 1GB DDR3 memory so on the face of it I should see less performance from the PlayGo.

OUT OF THE BOX

The packaging for the PlayGo is simple but does its job, not dissimilar to an iPhone. The back of the box also lists the machine’s specs.

IMG_3525-mini

If you’ve been used to a larger handheld like the Blaze Tab, the unit seems tiny at first! It’s about the size of a standard iPhone (but about 1.5x thicker), and smaller than an iPhone Plus.

My Blade Tab literally bends in my hands if I stress it due to the cheap plastic case, but the PlayGo doesn’t move at-all and feels like a really well made bit of kit. The model I have is the latest as it comes with four screws in the back, older test models had two screws and had some flex under stress.

If you have large hands the unit might actually be too small, but for my average-size hands it feels good and the buttons are positioned well.

IMG_3542-mini

CONTROLS & AUDIO

The D Pad feels good to the touch. If you press it very lightly it doesn’t respond, so you do have to apply some pressure, but not undue pressure – it feels normal.

The A B X Y buttons feel good too. That should be a done deal, but as the few people who got hold of a Vega + found, it can render a machine un-usable. The controls on the PlayGo remind me a bit of the feel of the GameBoy – nicely rounded off at the edges and with just the right response.

The only negative is the joystick. I’d go so far as to say it’s un-useable. On the Blaze Tab the joysticks are PS4-style where they pivot from a fixed point so the stick leans over under the pressure of your thumb. But on the PlayGo the stick doesn’t lean and instead stays parallel with the device, sliding in the direction you push. Perhaps this would work, but it has such a low profile and resists being pushed so it doesn’t really move it quickly in any direction. It’s an odd choice for a direction stick when other devices have tried and tested solutions. Fortunatly I tend to use the D Pad for older games so it hasn’t presented itself as a problem so far.

Audio from the single speaker is good. I’d probably have preferred if they ditched the joystick for a second speaker as I’m never going to use the joystick, but the sound is plenty fine as it is. It might just be my unit but plugging in headphones was a problem. I tried a few headphone jacks and none seemed to fit the port. I looked online in case I was about to jam something in to a port that wasn’t even for headphones and found a few people mentioning issues with the fit of headphones. In the end I just forced the jack in harder and it worked. It just seems that either my unit or some of the units have a cheap port. Once in, sound from the headphones is good.

BATTERY

The battery has a life span of around five hours which is solid for plane and train journeys. I haven’t yet tried charging it on a plane to see if a USB socket will power it, but I found my iPhone rarely charges on a plane so I’m going to guess five hours is all you’ll get on a plane.

A major plus of the device is that the battery is removable, so should you keep the device long enough to see battery wear, you can swap it out for a new one!

IMG_3537-mini

TURNING IT ON

The GUI is pretty intuitive, which is handy because there are no instructions in the box, and you’re prompted with key presses to navigate around. I haven’t investigated any of the other icons yet and went directly to the emulators.

Unlike some devices which come without anything installed, the PlayGo has a number of emulators (and roms) pre-installed…

  • XMame v1.3 (Arcade)
  • Mame4all (Arcade)
  • FBA (Arcade, also WIP drivers for Megadrive/Genesis, ColecoVision, Sega SG-1000, Master
  • System, Game Gear, PC-Engine, SuperGrafx)
  • Dosbox (Dos PC)
  • Fceux (NES)
  • Gambatte (Gameboy)
  • OhBoy (GameBoy, GameBoy Colour)
  • ReGBA (GameBoy Advance)
  • Genesis Plus GX (Megadrive/Genesis)
  • Picodrive (Megadrive/Genesis)
  • Oswan (Wonderswan)
  • Pcsx4all (Sony Playstation)
  • PocketSNES (SNES)
  • Race (NeoGeo)
  • ScummVM (for adventure games like Monkey Island)
  • Temper (PC Engine)
  • Gngeo (NeoGeo)

So far I’ve only tested Mame, Genesis Plus GX and ReGBA, and all work. I wouldn’t expect any performance issues from them but I’ve not tested anything to destruction at this stage.

Each emulator is configured individually as you might imagine, so the button presses for each are not necessarily the same. For example, I assumed under Mame that select and start would be credits and start, but neither responded. Without documentation it took me a while before I figured out that you have to hold one of the shoulder buttons while pressing the key. Also, I found the other shoulder button opened the in-game menu to activate cheats and things, whereas in ReGBA is wasn’t until I pressed the off switch lightly (not holding it down) that I found the menu. It seemed an odd key to assign that function to. Really, that’s really just a case of learning your way around each individual emulator rather than any fault of the device.

IMG_3538-mini

The picture here makes the screen look terrible, but it’s actually beautiful! The photo does it no justice at-all. After having gotten used to a 7″ screen I thought the 3.5″ screen might actually be a bit on the small side, it’s about 2/3rds of the size of my iPhone Plus and about half the size of the Blaze Tab, but the picture quality is great! The image is really clear, along the lines of an iPhone, and the glass screen really helps too. Testing Golden Axe in Mame, I could see details down to the pixel so I was never straining to see a tiny icon.

ADDING EMULATORS & ROMS

Each emulator has a bunch of roms already, tending to be loaded on in alphabetical order and stopping at “G” or similar. If you’re not particularly fussed with your collection of games then you’ll already gave plenty loaded on to the device to keep you occupied. But likely if you’re buying this device it’s because you want to curate you own collection.

I found this video on YouTube for a simple how-to for adding additional emulators and roms to the device. There are probably plenty of other video but this one was nice and simple for me…

The video also links to this site which has more emulators to install.

I particularly wanted to play the English fan translation of Mother 3 on the GameBoy advance so I found the rom and played it under the installed version of ReGBA. Unfortunately the emulator that comes installed doesn’t seem to have a full-screen option, or at least not that I could find, so the game screen was surrounded by a GameBoy Advance window which further reduced the image size making it tiny within the 3.5″ display. This was a good excuse to test out installing another emulator.

Following the instructions in the video above I navigated to gcw-zero.com and downloaded the later version of ReGBA. Installation was instant and this version defaulted to full-screen. The process of adding emulators and roms does seem incredibly simple on this device, more so than the Blaze Tab’s Android operating system which was times felt a bit clunky to navigate.

OVER-ALL

I really like this device!

It black PlayGo edition looks great, it feels good in your hands and drops in to a pocket like a phone, the screen is excellent quality and aside from the joystick the controls respond really well making games feel good to play.

If you already have something like an RG350 then this unit likely isn’t an essential purchase as both units are essentially the same device in different cases, but if you’re looking for a handheld or have an old unit that you’re looking to replace then I’d highly recommend the PlayGo (or PocketGo v2).

Nintendo DS ZX Spectrum emulation

IMG_0952


Back in March 2016 my dream of owning a handheld ZX Spectrum (almost) came true when Indiegogo ran Retro Computers’ campaign for the ZX Vega +, a wonderful looking piece of hardware.

Cut to a year later and, getting a bit bored of waiting, I bought a Blaze Tab Plus to tide me over. Although feeling a bit cheap in the hands, and a little clunky to install and play ROMS due to the Android OS, the Blaze Tab was still a decent bit of hardware for playing games on the go, and was only ever supposed to be a stop-gap. However, another year later and it was getting pretty obvious (to everyone but me!) that the ZX Vega + was never going to materialise. Then finally, three years after the initial campaign, and with the loss of the Sinclair name, Retro Computers was wound down and the ZX Vega + with it.

Vega

The few Vegas that did make it out of the factory do not look to have been worth the wait. The finished product looked like a cheap version of the campaign render, and in review videos the controls were too stiff to be functional. It was a disappointing end to a disastrous campaign which started as a fantastic idea. But what the campaign did do was inspire me to find the best solution to the problem of a hand held Spectrum.

To give credit to the aforementioned Blaze Tab Plus, it has decent feeling controls which often seem to work straight off the bat with a new game, the screen is a great size (though the plastic scratches easily), battery life is good, especially at holding a charge when shut down, and once you get the hang of the Android OS it’s pretty simple to add ROMS. It’s not an elegant solution, but it’s certainly a solution, and you might be happy to stop there if you’re just in to arcade-style games. But for me, the key issue that a Blaze Tab-styled handheld highlighted for me, which would also have been an issue with the Vega +, was the lack of keyboard controls. Console and arcade cabinet games were more often designed around a basic joystick / d-pad control system with fire buttons, but some of my favourite computer games required keyboard inputs that render them unplayable on a handheld. Enter the Nintendo DS.

The Nintendo DS was never a system that interested me when it originally came out. I had a Sony PSP at the time which I almost exclusively used to play Grand Theft Auto titles while my girlfriend used her DS for Brain Training and something to do with puppies, plus it was pink! I really only saw the DS as a toy at a time when I was only in to ‘serious’ gaming. But during my search for a better piece of hardware to turn in to a ZX Spectrum, I came to realise that the DS was perhaps the perfect fit.

THE NINTENDO DS

In case you’re (somehow) not familiar The Nintendo DS, it’s a clamshell design, dual-screen handheld game console released in 2004. The two LCD screens work in tandem, the lower is a touchscreen where the stylus is typically used for additional game inputs, while the upper is the gaming screen. In 2006 Nintendo launched the DS Lite, which as its names suggests, was a slimmer model with improvements including a longer battery life and brighter screens. And in 2008 they released the DSi and DSi XL, the key features being inner and outer cameras and larger screens.

It was the combination of its small footprint and the lower control screen design that drew me to the DS, and clearly also a very clever guy called Patrik Rak who wrote ZXDS, a ZX Spectrum emulator for the Nintendo DS, which utilises the lower screen of the DS as a menu for loading games, configuring controls and, importantly, to display a virtual keyboard for additional game inputs!

WHICH DS TO BUY?

The first choice I had to make was what model of DS to use as the base machine. Clearly not my girlfriend’s original pink DS, so that went on eBay.

The key factors for me were over-all unit size, screen size and cost. Nintendo has a handy table on their website that demonstrates the differences, which in summary are…

DS

  • Height 84.6 mm Width: 149.0 mm Thickness: 28.7 mm
  • Weight 275g
  • Display 3.0 inches
DS Lite
  • Height 73.9 mm Width: 133.0 mm Thickness: 21.5 mm
  • Weight 218g
  • Display 3.0 inches
DSi
  • Height 74.9 mm Width: 137.0 mm Thickness: 18.9 mm
  • Weight 214g
  • Display 3.25 inches
DSi XL
  • Height 91.4 mm Width: 161.0 mm Thickness: 21.2 mm
  • Weight: 314g
  • Display: 4.2 inches

Although hardly big, I felt that the original DS is a little large with a small display. The DS Lite is a much better size, but still has the same small display. The DSi has a slightly larger display crammed in to much the same size as the DS Lite and also with a slight improvement to the thickness of the device. While the DSi XL has the best screen size, but with a larger body to accommodate it. For me it was between the DSi and DSi XL.

Eventually the smaller size of the DSi won out as I wanted something that I could put in a jacket pocket rather than always having to carry a bag. Also, at just £28 including postage and packing the DSi was the cheaper option unless I wanted a brown DSi XL!

IMG_0951

TURNING THE NINTENDO DS IN TO A ZX SPECTRUM

The Vega + was an initially attractive prospect for two reasons: First, it was a nice looking piece of hardware in the concept renders, and second, it was purpose built so loading and saving games wouldn’t require any effort unlike doing it via an emulator, right? Well, no. During the campaign it was revealed that the Vega + was going to run games using the Fuse emulator and while this didn’t put me off, it did now mean all I was getting for £100 was a nicely designed piece of hardware that looked like a handheld Spectrum (except it wasn’t as the final build models looked rubbish). So really, once I’d installed an emulator on the DSi, I was pretty much in the same position I would have been with the Vega +. Setting up the emulation process is really quite simple on the DSi.

First you need to download the ZXDS emulator. Then you’ll need a R4 3DS Dual Core card which I purchased from r43ds.org for about £22. So all in, I had a handheld ZX Spectrum for £47, which I’m sure you can do even cheaper if you pick up a cheap DS on eBay.

The R4 3DS Dual Core card comes with a micro SD Card USB reader / writer and a 4GB micro SD card. Pop the micro SD card in to the USB stick and the USB stick in to your computer and then follow the instructions on the r43ds.org site to copy the emulator to the correct place on the SD card. You’ll also want to go to a site such as World of Spectrum to find a selection of your favourite games, again, copying them to the correct location on the SD card. And while the process is incredibly simple, I must admit that when I first booted the DSi, I didn’t realise that the “Bomberman Land” icon was the installed card, and that I had to click it to get to the emulator so I ended up repeating the copying process a few times until I realised my mistake. Perhaps that’s just my unfamiliarity with the Nintendo DS menu system.

ZXDS EMULATION

Once up and running, the emulator itself is really quite intuitive and I was playing my first game before reading any instructions!

Icons and a virtual keyboard are displayed on the lower screen, while the upper screen is the familiar Spectrum boot screen. The 3.25 inch screen size feels good when using the stylus to navigate the menus – it’s never too small that you miss a key press. I tapped around the menu system figuring the “IO” option was probably the gateway to loading ROMS and that “Controls” was probably the place to go to select the Kempson joystick. Yes, it’s that easy!

zxds

There were a few mis-steps along the way. Sometimes a ROM wouldn’t load and I’d have to go to the “System” menu to switch machines and try again. But then, I’m pretty sure I would have encountered exactly the same issue with the Vega +. It’s probably an idea to add the machine type to the name of your ROM files so you know when to switch between 48k and 128k modes.

Save states also work really well, and by saving a screen at a time I’d completed Manic Miner within a day!

The only aspect of the emulator that I haven’t figured out yet is how to use poke files. Back in the day I had some kind of snapshot interface for freezing a game and poking the memory. ZXDS appears to read .pok files, but I haven’t found any documentation about how to do this so games like Sabre Wulf and Atic Atac are still impossible!

PLAYING GAMES

The DSi itself is absolutely perfect for playing ZX Spectrum games. The controls feel great to the touch and the d-pad is good substitute for a Kempston joystick, I completed Manic Miner without ever making a mis-step due to the d-pad, only mu own ineptness! You can also configure the controls to add a keyboard command to an additional fire button which was always a short coming of the one button joysticks back in the day.

RebelstarIIIt also works really well for strategy games that require the keyboard. Rebelstar 2 was always one of my favourites and that works perfectly with the stylus.

The upper screen displays the Spectrum picture beautifully and the pixel resolution is actually exactly the same as the Spectrum’s 256 × 192.

Sound from the DSi is great too, the only thing that the system doesn’t have is a screen overlay when you increase or decrease the volume – I guess I’ve gotten used to my Mac showing me what my volume level is. But that’s hardly a criticism.

IN SUMMARY

If you’re looking for a handheld system for the ZX Spectrum, I would strongly encourage you to check out the Nintendo DS.


Star Wars: The Last Jedi

I’ve been arguing the merits (or not!) of The Last Jedi with friends and colleagues. On the plus side, the movie certainly has got people talking about Star Wars, but on the negative side, it’s for all the wrong reasons!

I stand by my feeling that it has a great third act that is undermined by an OK first act and a terrible second act.

I’m hoping JJ pulls the series back in the direction I thought it was taking with The Force Awakens and less Harry Potter and The Last Jedi!

THE LEGEND OF ZELDA: A LINK TO THE PAST

ZELDA medium resolution

I recently painted a mock-up of Out Run on the ZX Spectrum as it could perhaps have been had someone been given more time on the graphics. I was quite pleased with how it turned out for my first attempt at some in-game Spectrum graphics, so I thought I’d have another go on another notoriously monochrome game…but then I got distracted playing The Legend of Zelda: A Link to the Past!

I’ve never played any of the Zelda games before, but since getting a Blaze Tab Plus from FunStock I’ve been getting in to the SNES, and particularly this game. It’s incredible!

While looking up various Zelda material, I came across this video of a brilliant work in progress version of Zelda on the ZX Spectrum by a guy called David Clarke, and it made me wonder what Zelda could look like on the Spectrum?

ZELDA actual resolution
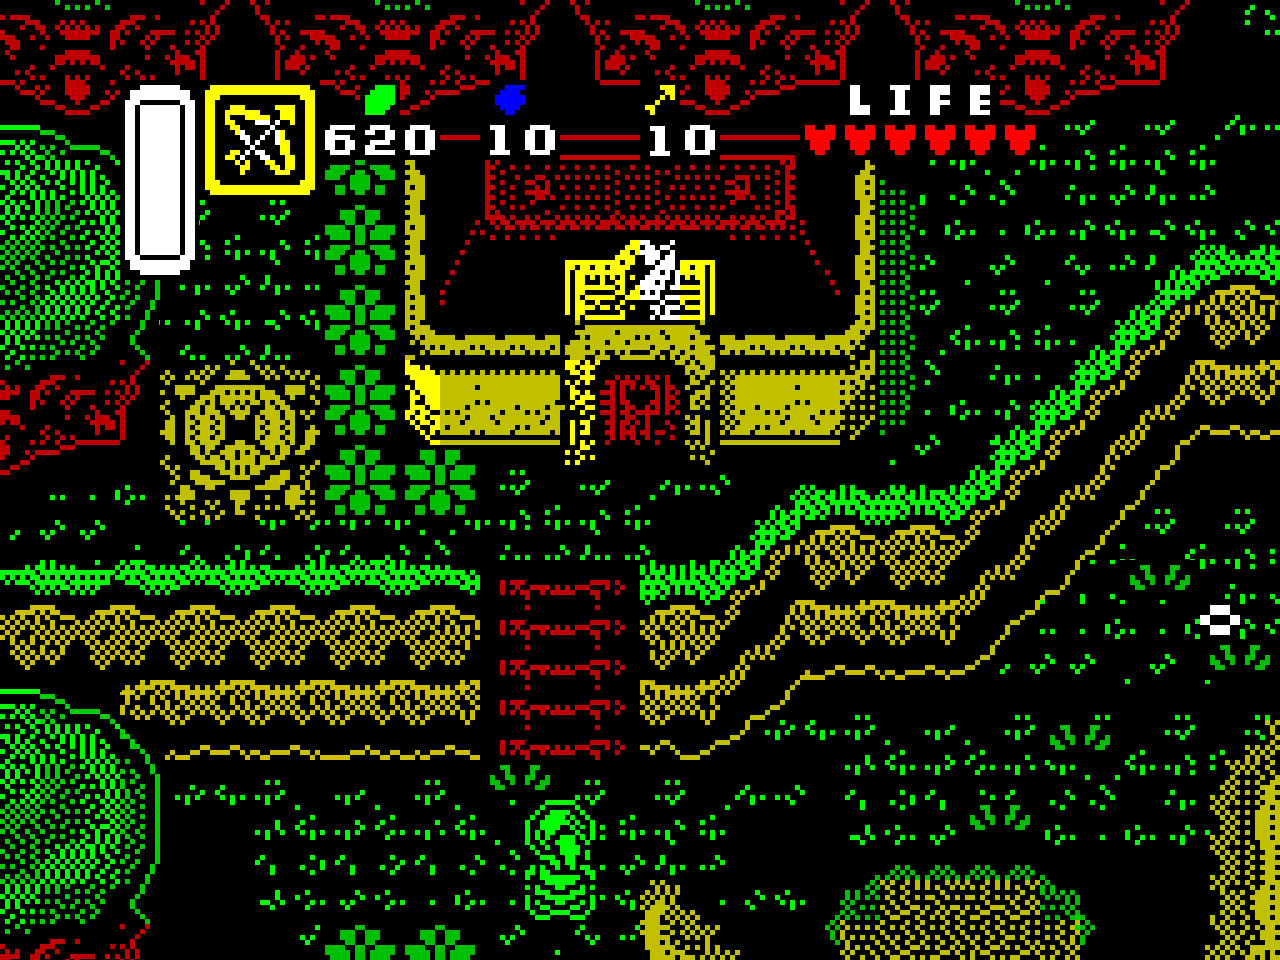
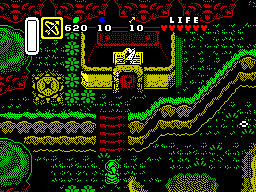
The picture shown is my attempt at an in-game screen (shrunk back to 256×192 here, and shown larger at the top of the page).

I found this one more complicated than Out Run and it took me a couple of days in all to get it to this stage.

So for those interested in what I did, another explanation follows…

ZELDA SNESFirst I took an in game screen from the SNES version and cropped it to 256×192 resolution to match the ZX Spectrum resolution. I then increased that image in Photoshop to 2560×1920 so I could work on the image.

Like the Out Run image, I selected two square brushes to match the sizes of a single blown-up pixel and an 80×80 block of colour (at the new high resolution). Then I went to the view menu and turned on the grid option, altering the grid dimensions in the preferences menu so my screen was divided in to 80×80 sections. This made it easy to lay down blocks of colour and pixels so that they didn’t break the colour clash rule and aligned correctly; my practice on the Out Run image made this a fairly slick process this time around.

I started by trying to painting directly on top of the image, replacing the SNES palette with the Spectrum palette but I quickly began to appreciate how difficult it was for the old Spectrum artists to work with colour clash! It was incredibly limiting! So I looked to a few old Spectrum games to see how they worked around the problem and one in particular stood out called Robin of the Wood. It’s not a game I’d ever played, but I was really impressed at how they’d managed to use the colour palette, and it’s quite a Zelda-like adventure.

I decided that Robin of the Wood worked so well because they used a black background as the base colour, and then black as the main line-art colour with other colours being used to fill each ‘sprite’ or ‘tile’. So using that inspiration I started again!

ZELDA monochrome

This time I ran the SNES image through a handy App on my iPhone called Retrospecs to take a pass at making a monochrome version with Spectrum-sized pixels. After playing with the settings I got a good result out of Retrospecs that served as a good starting template. Then I started cutting that image up it to ‘sprites’ and aligning them to the 80×80 grid.

This simplified image was much easier to work with. It still took a while to see where to use black to define an image and where to use a colour, but it gradually turned in to selecting the most suitable base colour for the object and drawing on to it with that, using black to draw in the detail.

For larger objects like the house, after adding the base colour I could then look where I could use other colours to add highlights or details. If I was painting more screens, like the various towers in Zelda, I’d use this kind of technique to add more colour.

The only aspect I’d like to improve is the Link sprite. I’ve left him bright green in this image as he’ll spend most of his time walking over grass in the game, and that fits his costume colour. As you’d want him to move by the pixel rather than in blocks of 8 pixels I haven’t tried to add colour to him like Karnov – Zelda isn’t that kind of game.

I’m really happy with the final result! I totally want to play Zelda on the ZX Spectrum now! Any comments, let me know!

(I’ll try and do Robocop next!)

OUT RUN

OUTRUN colour medium

Outrun arcade
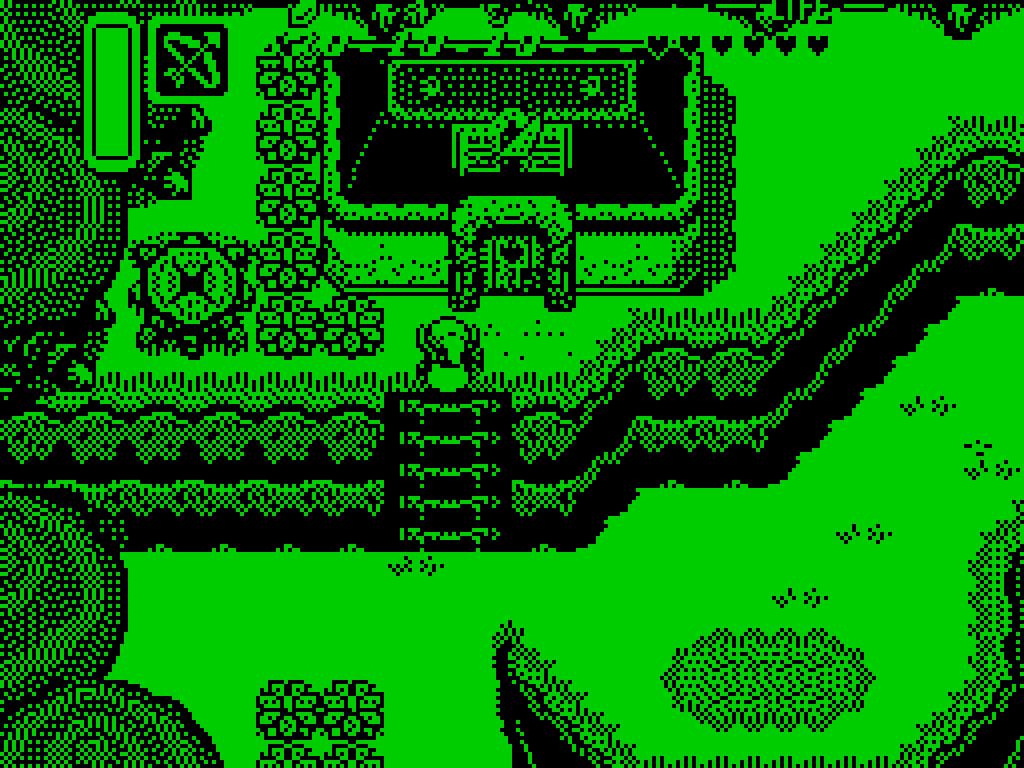
I have a soft spot for Out Run on the ZX Spectrum. I was probably blinded by my love for the arcade version and my desperation to own it in some way that made me enjoy playing it so much on the ZX Spectrum. Even looking back on it now, it was a valiant effort at porting the arcade version in to a tiny 48k, 8-bit machine. And the game is actually much better on the 128k machine with no multi-load to interrupt gameplay and even a couple of in-game sound tracks that play alongside the sound effects.


Outrun in game screen
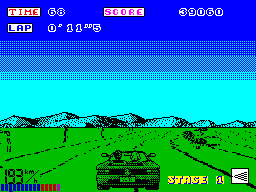
And yet, even at the time there was that nagging feeling that it wasn’t quite as good as it could have been. It ran quite slowly until the third stage where I thought my machine had broken when I first played it, as it slows even further to a near stand-still due to the attempt at remaining faithful to the arcade’s tunnel section. And you always had to explain to friends why the road was green…and hope that they didn’t make it to stage four when it turns bright magenta! But that’s the best you could do on a Spectrum, right?

Chase HQ in game screen
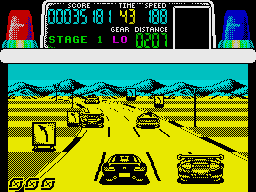
Well no! Just two years later, Chase HQ appeared on the ZX Spectrum and showed what Out Run could have been. It was fast, the graphics were beautifully drawn, and even retained sampled speech from the arcade on the 128k version! And tunnels? Not only did they fill the screen but the developers even changed the pitch of the sound as you drove through them! But maybe best of all, the road was either concrete grey or desert sand yellow, which meant that your friends no longer asked why you were driving on grass…or began laughing when someone reached stage four!

But as good as Chase HQ was, it was still predominantly monochrome. And I always felt that there probably could have been a little splash of colour given how fast it all moved – colours jumping in 8×8 blocks would look fine at Chase HQ speeds. So I thought it would be interesting to see what might have been with Out Run – what could it have looked like if the graphic artist had worked around the colour clash limitations.

OUTRUN colour small
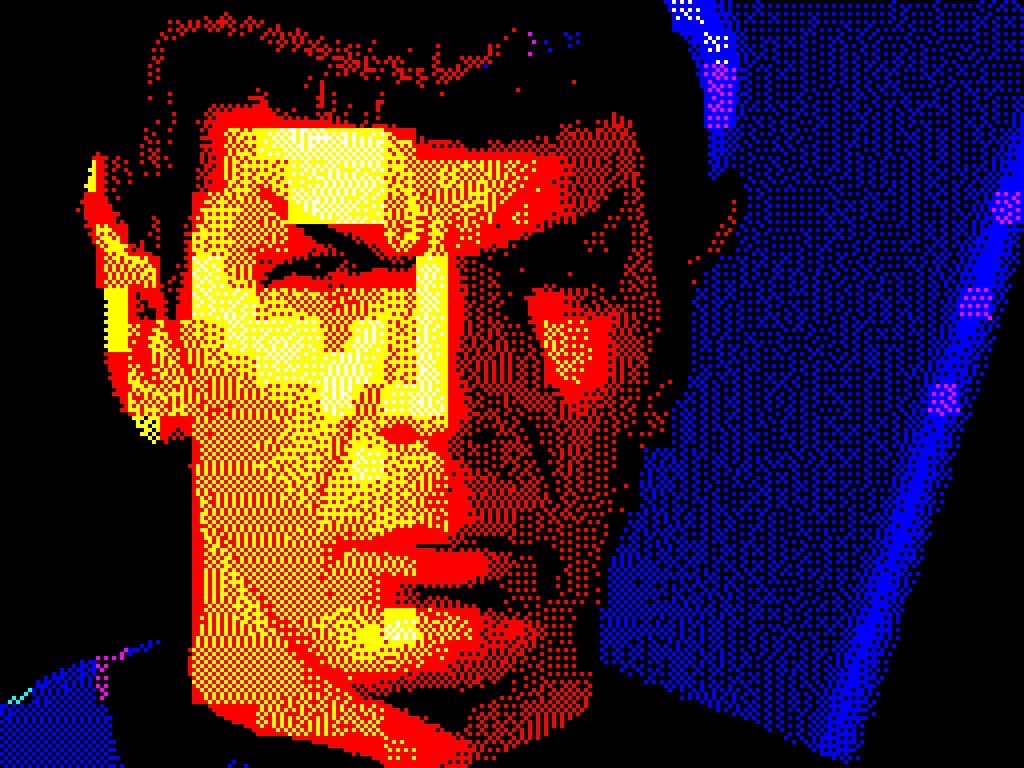
The picture shown here is my version of an in-game screen (shrunk back to 256×192 here, and shown larger at the top of the page). I’ve only spent about a day on it and I’ve adhered pretty closely to the original graphics so as not to end up with a completely different looking game. I’m sure it could be done better than this, but it’s interesting to get a glimpse of what might have been!
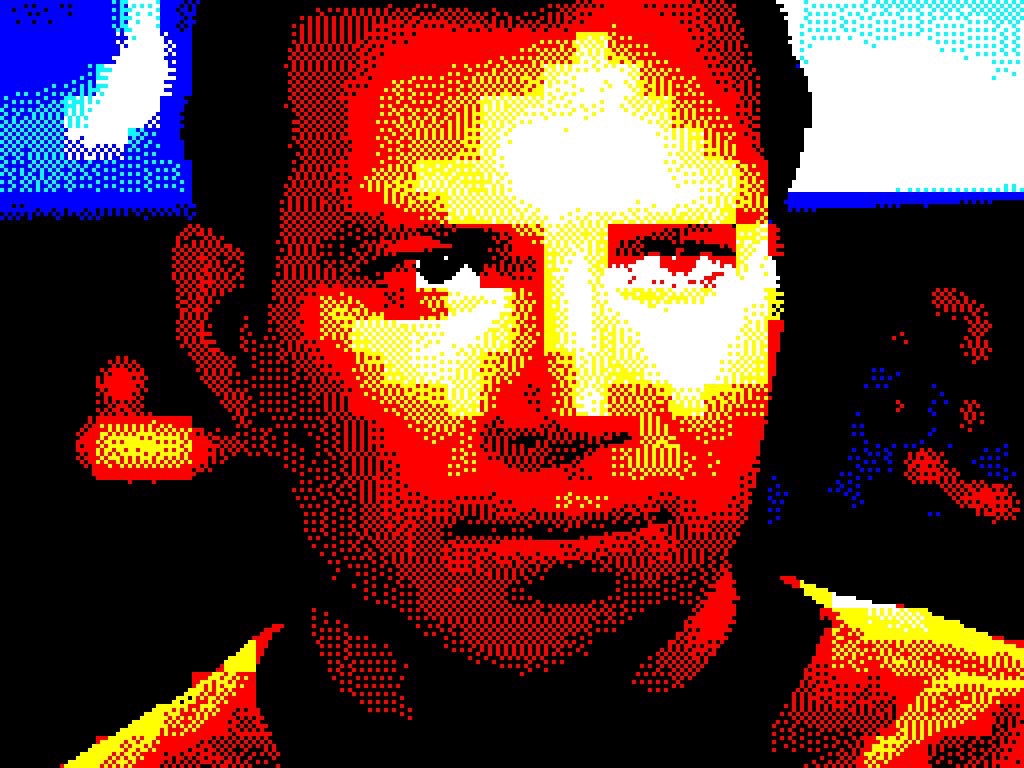
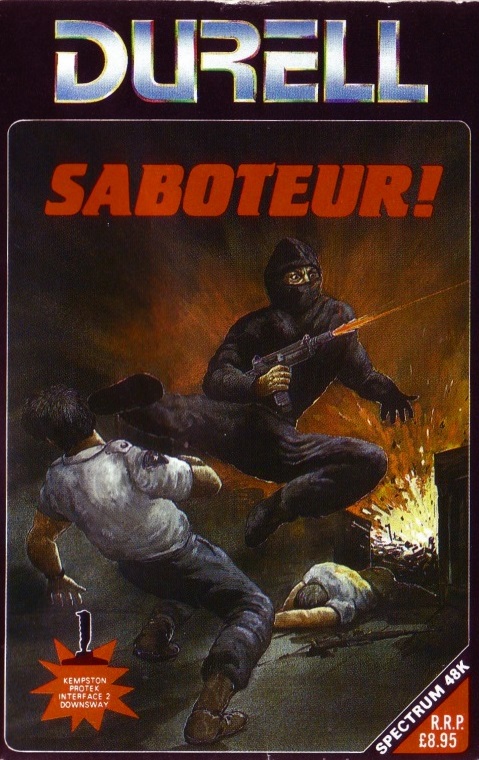
For those interested in what I did, a little explanation follows…

First I took a ZX Spectrum in-game screen shot at 256×192 resolution and increased that in Photoshop to 2560×1920 so I could actually see what I was doing!

Next I had to consider both the working pixel size and how colour clash worked. I selected two square brushes to match the sizes of a single blown-up pixel and an 80×80 block of colour (at the new high resolution). Then I went to the view menu and turned on the grid option, altering the grid dimensions in the preferences menu so my screen was divided in to 80×80 sections. This made it easier (but still a bit fiddly) to lay down blocks of colour and pixels so that they didn’t break the colour clash rule and aligned correctly.

Next I took some Chase HQ and Out Run screens for misc roadside items, mountains etc and re-drew these at the larger scale and coloured them in. I tried to keep different objects on different layers so I could work on them separately.

The first thing I wanted to do was have a concrete road to match the arcade version, so I took my cue from Chase HQ for the look of that. I think it already improves the game!

I was never sure why Chase HQ left the mountains the same colour as the sky. Probably because of the line that would have been created between the top of the mountains and the sky. So to get around that issue, I added a layer of silhouetted mountains behind the FG mountains which allowed me to colour the FG a sandy yellow and use the black colour to separate the yellow of the mountains and the blue of the sky. It works quite well I think and doesn’t look like a tactic to avoid colour clash. I also worked a couple of shades of yellow in to the mountains just for a bit of variation.

I figure that objects would be flying towards us pretty quickly as in Chase HQ, so having FG objects jump in blocks of 8×8 pixels wouldn’t notice. In fact, in Chase HQ I’m sure FG objects jump in at least blocks of 8×8, so there is no reason not to colour them! Here I admit that my alignment of the trees and signs in the final image might have broken the colour clash rule if you measure it all out carefully (I could do better if I spent another day on the image), but the trees and signs themselves do adhere to the colour block rule within the sprite itself, and it’s only their on-screen placement that might be a few pixels out here and there. But in principle, this image is possible. The trees were the most awkward object to work with as the palms taper to a point and that doesn’t work so well with large squares of colour, but I think I did OK with them. For further levels it’d be better to stick to buildings and other square objects!

I decided to leave the sky as it was. With more time I probably would have gone for an IK+ sort of thing, but actually I quite like the banding of the Spectrum Out Run sky. At the very least I’d shift it all up a bit and add a nice yellow sun to the sky and some fluffy white clouds as that wouldn’t cause any colour clash issues against a plain cyan sky.

I decided to move all the HUD graphics to the top of the screen. These could look much better, but I wanted to concentrate time on the game graphics themselves so I left them much as they were and just realigned them and compacted them. I did recolour the speed indicator which looks much nicer I think (again, there may be a few pixels of error there, but it’s possible to lay it out like that).

Finally, the biggest issue of Out Run on the Spectrum for me what that the iconic red Ferrari Testarossa was green or whatever colour the BG was! Considering that the car doesn’t move, and the screen instead moves around it, there was no reason I could see not to make it red (at least no reason colour-wise). The shape is a little problematic for the blocks of colour, but I always felt that the car itself was well drawn so I didn’t want to alter it too much and just add colour to what was there. There are some compromises, but I managed to paint it red and even add some different colours to the lights, the Ferrari badge and even your girlfriend’s hair! For my efforts I also gave myself a personalised number plate!

Over-all I’m pretty happy with this effort as it was my first attempt at taking an old Spectrum screen and trying to add colour. Now I’ve had a little practise, I could do better (I’m thinking of looking at Robocop next) and also iron out the small errors I can see where the colour clash rule has been broken. But if this was the game I’d bought back in 1987, I would have been ecstatic…and would never had to explain away that green road!


STAR TREK BEYOND

Imagine if those rumours about William Shatner being in Star Trek Beyond had panned out in a sort of young Kirk and Spock meeting old Kirk and Spock way!

I’d love to see an Elite-style Star Trek game on the ZX Spectrum! Was there even an official Star trek game on the Spectrum?

Meanwhile, you’ll have to make do with some Star Trek Beyond ZX Spectrum artwork!

IMG_5654

IMG_5651

IMG_5653

IMG_5680

SABOTEUR!

Saboteur Box ArtUntil I bought Saboteur, my collection of Spectrum games were all copies on C15 cassette tapes from my dad’s workmates, the name of the game scribbled on the inlay in biro. I knew nothing about these games – whether they had been reviewed well, what the controls were, what the plot was or even what the aim of the game was. To try and make my games collection look somewhat more professional I used to make my own inlays by cutting out the adverts from computer magazines (sad, I know!), but it wasn’t quite the same! I desired real box art!


American NinjaAnd probably more than anything it was the box art that drew me to my early purchases. Back then, I didn’t have a regular subscription to a computer magazine (unless you count trying to read Crash cover to cover in the newsagents) and it was hit and miss whether the guy behind the counter in the computer shop would let you load a game before you bought it. So as my eyes scanned the shelves for what was to be my first ever purchase, I looked for something that spoke to me, aged ten in 1985. And there it was – a game called “Saboteur!” featuring a black clad ninja, doing a flying kick on a security guard, while simultaneously firing a sub machine gun, framed by an explosion! And this wasn’t Ultimate-style box art, this looked like one of those 18-rated VHS tapes in the video shop that you longed to rent!
For the first time in my game-owning history, I now knew what the purpose of the game was: “You are a highly skilled mercenary trained in the martial arts. You are employed to infiltrate a central security building which is disguised as a warehouse. You must steal a disk that contains the names of all the rebel leaders before its information is sent to the outlying security stations. You are working against the clock, both in getting to the disk, and in making your escape. You must enter the building from the sea by rubber dinghy, and will then only be able to leave by the helicopter on the roof. You will have to find your way around the warehouse, making use of the guards’ own weapons supplies in your struggle through overwhelming odds.” So now, instead of running around screens endlessly fighting enemies and not knowing there was actually something else I had to do to complete the game (Sabre Wulf, Atic Atac…), I knew exactly what my mission was – find the disk, set the bomb, escape!

Saboteur Loading Screen
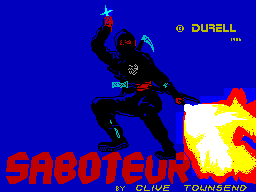
More often than not, this would now be the bit in the story where the excited ten year old goes home and finds they’ve been duped by some expert marketing and some screenshots from a different system. But the loading screen continued that promise of playing an ass-kicking ninja, featuring our hero brandishing a throwing star and flamethrower! And while the title music was limited to a simple beeper tune (Saboteur! is a 48k only title, coming out the year before the 128k machine was available), it’s a memorable one that seemed, in my mind at least, to fit the ninja theme.

When the game began, ten year old me was blown away! First, I was arriving on a rubber dinghy just as the inlay had promised! How many times did the inlay describe a dramatic event and then actually begin a game with you standing in the middle of the screen with no sign of that event ever having happened? And second, the graphics were incredible! And over thirty years later, I am still as impressed!

Saboteur In Game Screen 1
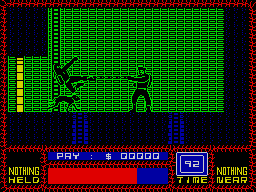
The main character sprite is big! About a 1/4 of the screen height. He’s also well drawn and animated, with a nice stealthy run animation and a cool looking jump kick. Colour clash is also smartly avoided with him decked out in all black. The environment that he explores is also beautifully drawn and colourful. On the first screen the dinghy is yellow, the (animated!) water aqua blue and the pier red. There also seems to have been a real effort to give different areas of the map a different identity. The warehouse areas feel, well, warehouse-y with crates and things, while the tunnels below feel suitably dark, deserted and dank. There are nice graphical flourishes throughout too – an inanimate lifting crane, reel to reel computers etc.

All of this would likely fall apart if the game used scrolling, so wisely it opts for a flip-screen approach. This I think actually works better for Saboteur as (until you remember where things are) you don’t know what you’re going to run in to on the next screen. It gives the game a nice feeling of the unknown around each corner.

Saboteur In Game Screen 2
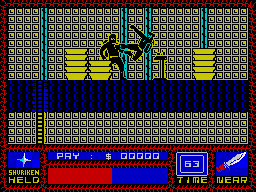
The aim, as the inlay explains, is to find the disk, plant the bomb and get out using the helicopter, and after that description there’s no more hand-holding. You have to sneak around the map exploring all the rooms trying to find their secrets. Again, the graphics come in to play here as they’re different enough to start helping you memorise paths, but uniform enough that you can still get a bit lost.

On the second screen you encounter your first enemy, a guard dog. Our saboteur can punch and high kick, but his training seems to have been cut short and he’s not yet learned any kind of crouching attack moves to deal with dogs. The artwork also lied when it showed him brandishing a sub-machine gun, or a flamethrower on the loading screen. But I’ll forgive it that. So choices are to jump over energy-sapping dogs when you see them, or if you’re holding a weapon you can perform an angled throw which will despatch them with one hit. It’s a tricky move to perform right every time, and it’s frustrating when you misjudge the distance, but you never feel cheated – if you miss you know it’s because you hit the fire button at the wrong moment or missed the diagonal on the joystick. Our saboteur can only carry one item at a time and once thrown it’s gone. With a finite number of weapons laying around the map you’ll need to choose carefully when to use one.

Moving on from the encounter with the dog you’ll come across the next line of defence in the warehouse, ammo-firing security cameras. These provide a fairly minor challenge on the easier levels and mostly deal out a shot which just smarts rather than causes you any serious problems.

The other kind of enemy the game throws at you are beret-wearing guards. These guys look great! Mostly they’ll just run at you and engage in a bit of hand to hand combat, but occasionally they’ll open fire with a sub-machine gun. A single blow will kill them meaning they’re a far easier enemy to deal with than a dog, but you can still find yourself running low on energy and running in to a guard at just the wrong time.

The health mechanic in the game is excellent. Rather than a frustrating single hit kill, you have a health bar which is gradually depleted when attacked, if you submerge yourself beneath water (nice touch!) or fall from a height. And in a very modern gaming mechanic, your health bar will slowly replenish if you stand still. The health mechanic works well in conjunction with the depleting time limit as you have to carefully judge when to keep going and fight whatever or whoever you run in to, and when you need to stop to catch your breath.

Everything is balanced so well in Saboteur!. The enemies are an obstacle, but one that’s easy to overcome if you’ve got a full health bar. The platform jumps don’t require pixel perfection, but you’ll find yourself falling off one when your health is too low or your time too short. And your health bar is plentiful but often depleted dangerously low just when you don’t need it to be. It feels that Durell put a lot of time in to balancing this game. And that balancing extends to the race against the clock and the size of the map area. The map is small enough and the time long enough to allow you to explore, but also large enough and the time short enough for you to find yourself having taken a wrong turn and having to take risks to get back on track.

Saboteur In Game Screen 3
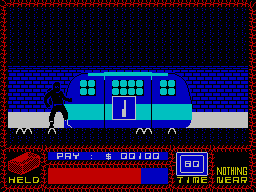
Saboteur! is also one of the most atmospheric games I’ve ever played on the Spectrum. And it manages to do that with limited sound and graphics, but also to keep throwing you a new visual treat as you progress, giving the game scope – the first time I ever found the underground monorail I was blown away! Durell could have just had a tunnel, but they went to the trouble of adding a monorail that you ride in (even if it does look like an old caravan). And if you do reach the helicopter, you’ll probably expect to run up to it and the game end – but no, the roof opens and the helicopter takes off!!!

Saboteur! was a game like no other that I’d played at the time – the way it looked so serious, and the way it actually did all the things the box promised! Perhaps because of that, or perhaps because I owned the box and knew what I was supposed to do, it was one of the few games that I completed as a child. And once you know the route around the warehouse and where to find the disk and the bomb, it’s actually quite easy – as an adult I can still do it usually after only one practise run to refresh my memory. But again, Durell thought of that and the game has several difficultly levels with each changing the configuration and speed of the enemies, the position of the disk and the bomb, the time limit and crucially also means you have to use terminals to open doors  which are now locked (you have to figure out which one opens which door through trial and error). The game is hugely re-playable anyway, but when you’ve mastered the basic level, you can crank the difficulty up and try again!

It’s a game that I have coming back to for over thirty years now, and it never gets old!

Version reviewed, 48k.

ALIENS

img_5676-2

Alien Isolation is one of my favourite games of all-time. It’s so tense! Yet I’ve never tried Alien or Aliens on the ZX Spectrum, though surely among the multi-load levels there should be a sub-game where you play Bishop and have to “do the thing with the knife” between Hudson’s fingers!